What Is HTML?
 HTML (HyperText Markup Language) is used by web pages, especially those using HTTP, or HyperText Transfer Protocols. HTML is the programming that translates coding into the images that you see, embedding videos and images and scripts, structuring a page’s content and providing the backbone for Benchmark’s email marketing software.
To properly code with HTML you will use HTML elements called tags. These tags are enclosed inside brackets. For instance, <h1> is the start tag for a large header font. At the end of the header or headline that we are encoding, we place an end tag, which includes a forward slash </h1>. These tags enclose the section or text that you want to format. We used the header tags in our first HTML Tips & Tricks blog.
The Benchmark Email Editor takes care of almost all of your HTML needs. But for those of you who like to do your own coding, or even for the curious who’d like to give it a try, these tips will give you a working knowledge of how to code, one tag at a time.
Making Lists
Today we’ll focus on making lists, unordered and ordered. Lists can be used to group categories and make information concise and easy to read. Using HTML to code those lists will ensure that your spacing will stay uniform and your alignment doesn’t go out of wack.
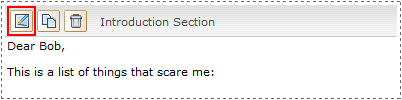
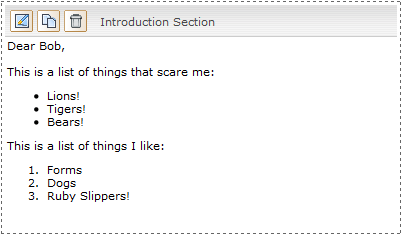
First, open your Email Editor (Step 4 when creating a new email) and choose a template, preferably one that doesn’t have too many colors or crazy designs already added. Find the section you want to edit and click on the pencil icon in the top left corner.
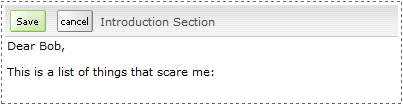
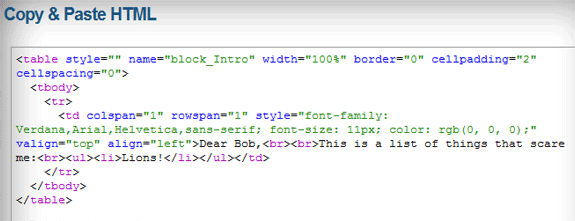
Delete all of the body text. This will give you less code to sift through when you start experimenting with your own HTML. Type a brief greeting and sentence to orient yourself when we start to code.
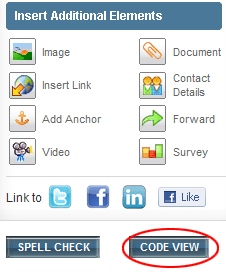
Now click on the Code View button under the Insert Additional Elements box.
This is the HTML of your document. In the Benchmark Email editor, the HTML is color-coded to give you ease of use. Locate your sentence. If you haven’t already, place a line break <br> after your sentence so that the list will start on a new line (for some cases the <br> will not be necessary – but to be safe let’s include it here). If you want the list further down you can add more line breaks until you’re satisfied.

Unordered Lists
To begin, we’ll try an unordered list. This is a simple list of bullets and the coding is very straightforward. To begin the unordered list, enter <ul> after your line break. This begins the code. Before we type our first line item, enter the line item start tag <li>.
Write the item. It can be as long as you want and will be aligned with one bullet. To finish the item, type </li>. To close the list, type </ul>. It is advisable to close the list so that it will not cause any errors when we check the template.
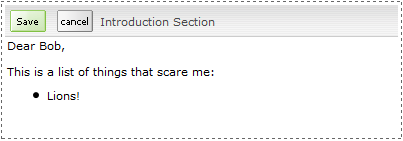
Save & Close and see how it looks so far.
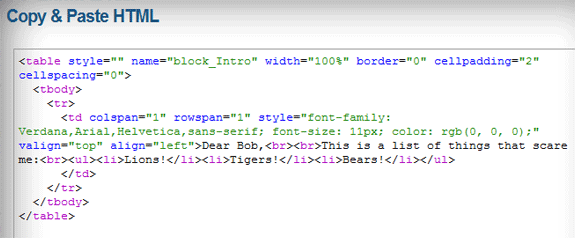
To add more items to the list, go back into Code View and enter a new <li> tag after your first item’s </li> end tag. You can add as many as you want, at whatever length, as long as the first and last items are still contained inside the <ul> and </ul> tags.
You can experiment with the headings, fonts and font-sizes to customize your lists.

An ordered list is just like the unordered list except the code inserts numbers instead of bullets. And, as you may have guessed, all it takes is an <ol> tag to start it off.
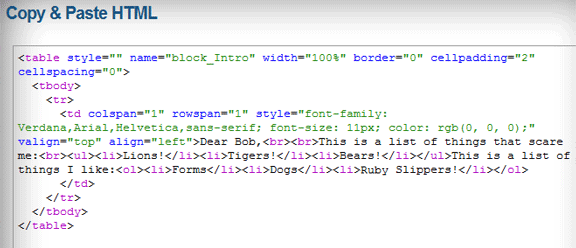
Use your <ol> tag to begin the code and then proceed just as before, using <li> for each new line item and </li> at the end of each new line item. When you’ve finished your list, use the </ol> end tag.
Remember, the HTML tags instruct your code how to appear. If it helps you visually to order the tags as seen below:

it will not affect your final product. As long as those tags are in place the code will know what to do with your data. Now that you know lists are nothing to be afraid of, try experimenting with a few of your own. Until then, happy coding!

Benchmark Recommends
See all articles

Sync 2,000 Contacts with your Benchmark Account for Free