


How to Move From Mailchimp to Benchmark Email (Without Losing Your Contacts or Your Designs)

Key takeaways
- Only two things need to move: your contacts and your templates. Contacts come over as a CSV file, and templates come over by copying and pasting the HTML. Everything else is quick setup on the Benchmark side.
- There’s no one-click import. Plan on about an hour to do the CSV upload and paste in your templates.
- Keep your unsubscribes separate. Import them as their own list and mark them as unsubscribed on upload, so nobody who opted out in Mailchimp hears from you again.
- Only sent campaigns can be copied. Mailchimp shows the HTML for sent campaigns only, so send any drafts you want to keep (even just to yourself) before you start.
- Automations, drafts, and past reports don’t transfer. Download any reports you want to keep before you close your Mailchimp account.
- Test before your first real send. Preview pasted templates on desktop and mobile, remove the old Mailchimp footer, verify your sending domain, and swap out your sign-up forms.
- You can do all of it on the Free plan. It covers up to 500 contacts and 2,500 emails a month, and live support is available 24/7 if you get stuck
Switching email platforms sounds like a project. You have years of contacts in Mailchimp, a few templates you actually like, and no spare afternoon to rebuild any of it.
The move is smaller than it looks. Two things need to come with you: your contacts and your email templates, and both travel light: contacts as a CSV file, templates by copy and paste. Everything else is a quick setup on the Benchmark Email side.
This guide covers what transfers, what doesn’t, the exact steps for each, and what to check before your first send.
What comes with you, and what doesn’t
Before you touch anything, it helps to know what you’re moving. Mailchimp lets you export your contacts as a CSV file and view the HTML behind any sent campaign. Those two exports are the whole migration.
| From Mailchimp | Moves to Benchmark? | How |
|---|---|---|
| Contacts (email, name, custom fields) | Yes | CSV export, then import |
| Email templates from sent campaigns | Yes | Copy the HTML, paste into the custom HTML editor |
| Draft campaigns | No | Mailchimp only exposes HTML for sent campaigns, so send or rebuild drafts first |
| Automations | No | The new Benchmark Email is built around campaigns rather than automated journeys |
| Past reports and engagement history | No | Download any reports you want to keep before you close your account |
Two honest notes. There is no one-click import from Mailchimp, so plan on a CSV upload for contacts and some copy and paste for templates. And if your Mailchimp account leans heavily on automated workflows, read the automations row twice before you move. Benchmark keeps email marketing simple on purpose, so it focuses on campaigns, segmentation, and reports rather than a workflow builder.
What you need: a Mailchimp login, a Benchmark Email account (the free plan works), and a lil’ treat for a job well done.
Step 1: Move your contacts
Start with contacts, because everything else depends on them. The whole process is one export and one import.
Export from Mailchimp
- Log in to Mailchimp and open your Audience
- Choose Export All Contacts
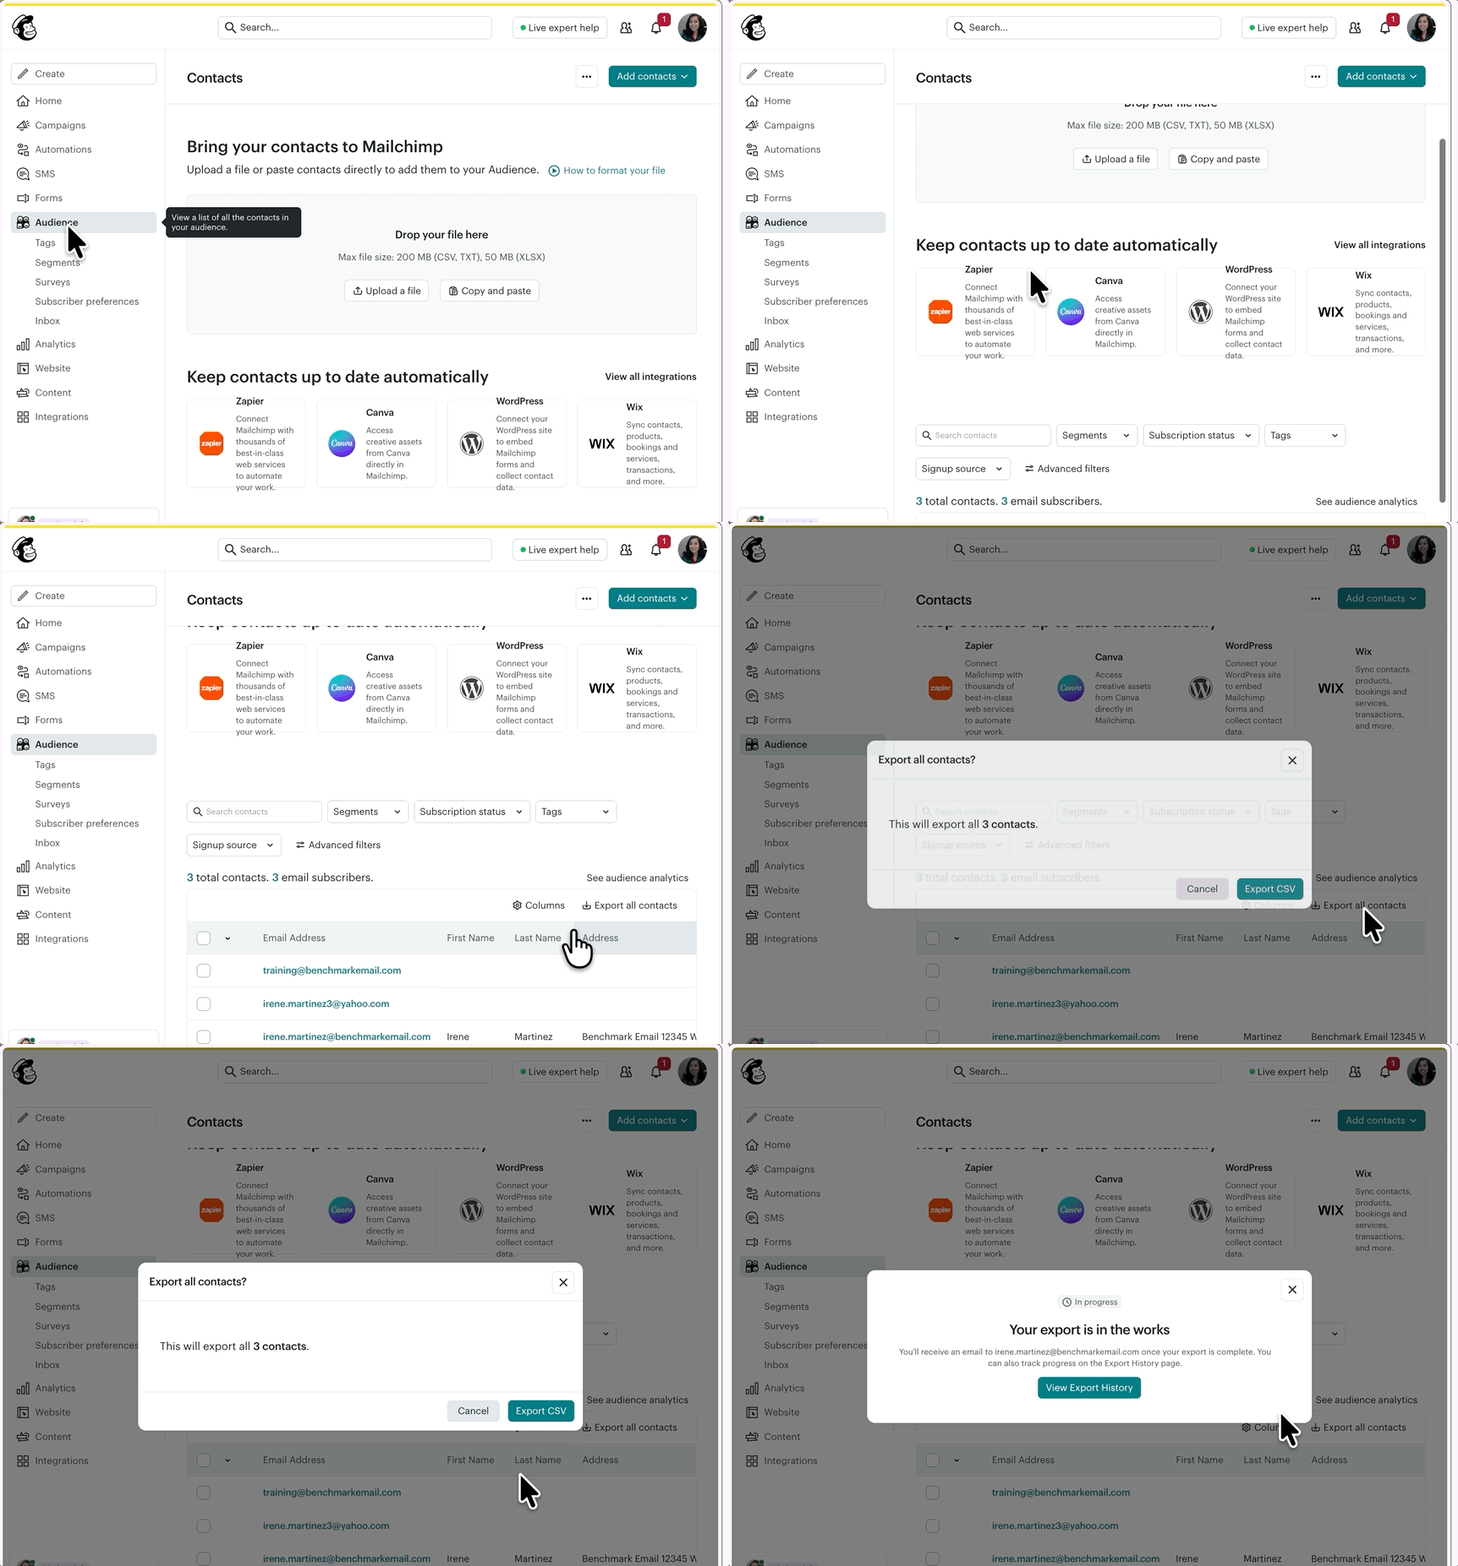
- Wait for the email from Mailchimp with your download link, then download the file
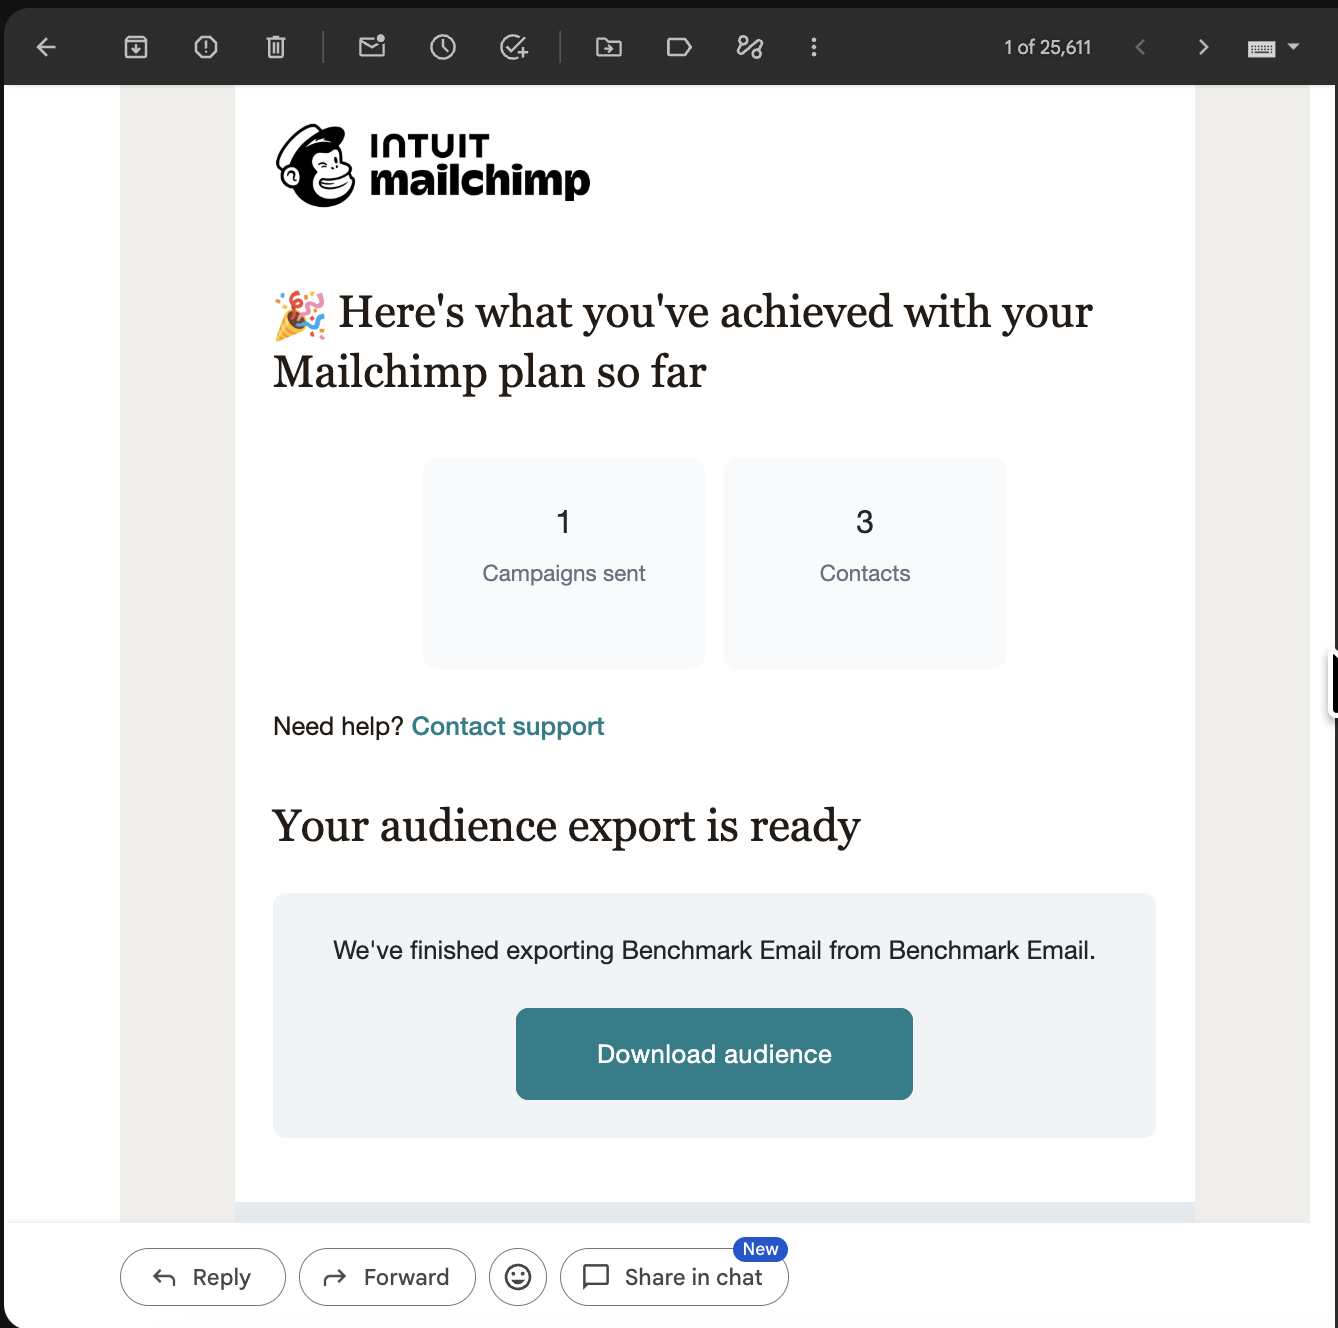
Mailchimp exports audiences as CSV files, which Benchmark’s import tool accepts. If your export arrives as a zip with separate files by status, keep both the subscribed file and the unsubscribed file. They go into Benchmark separately: subscribed contacts into your main list, and unsubscribed contacts into a list of their own, marked as unsubscribed on upload. That way Benchmark knows who opted out in Mailchimp and keeps them off every send, so nobody who unsubscribed hears from you by accident.
Import into Benchmark Email
- In Benchmark, go to Contacts and select Import Contacts
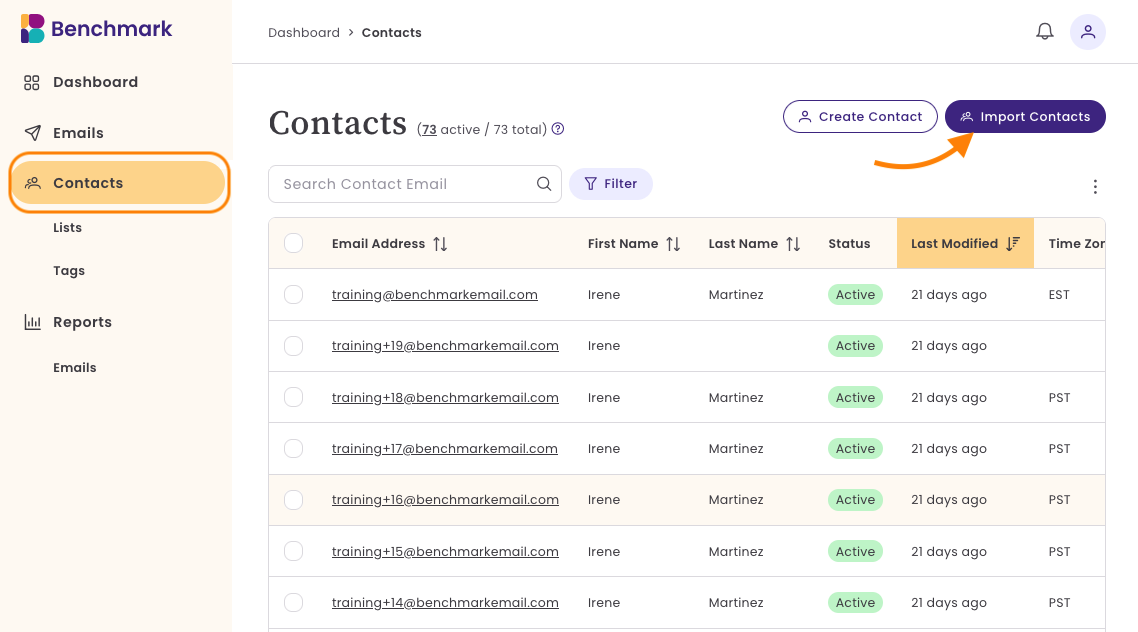
- Upload the subscribed CSV from Mailchimp
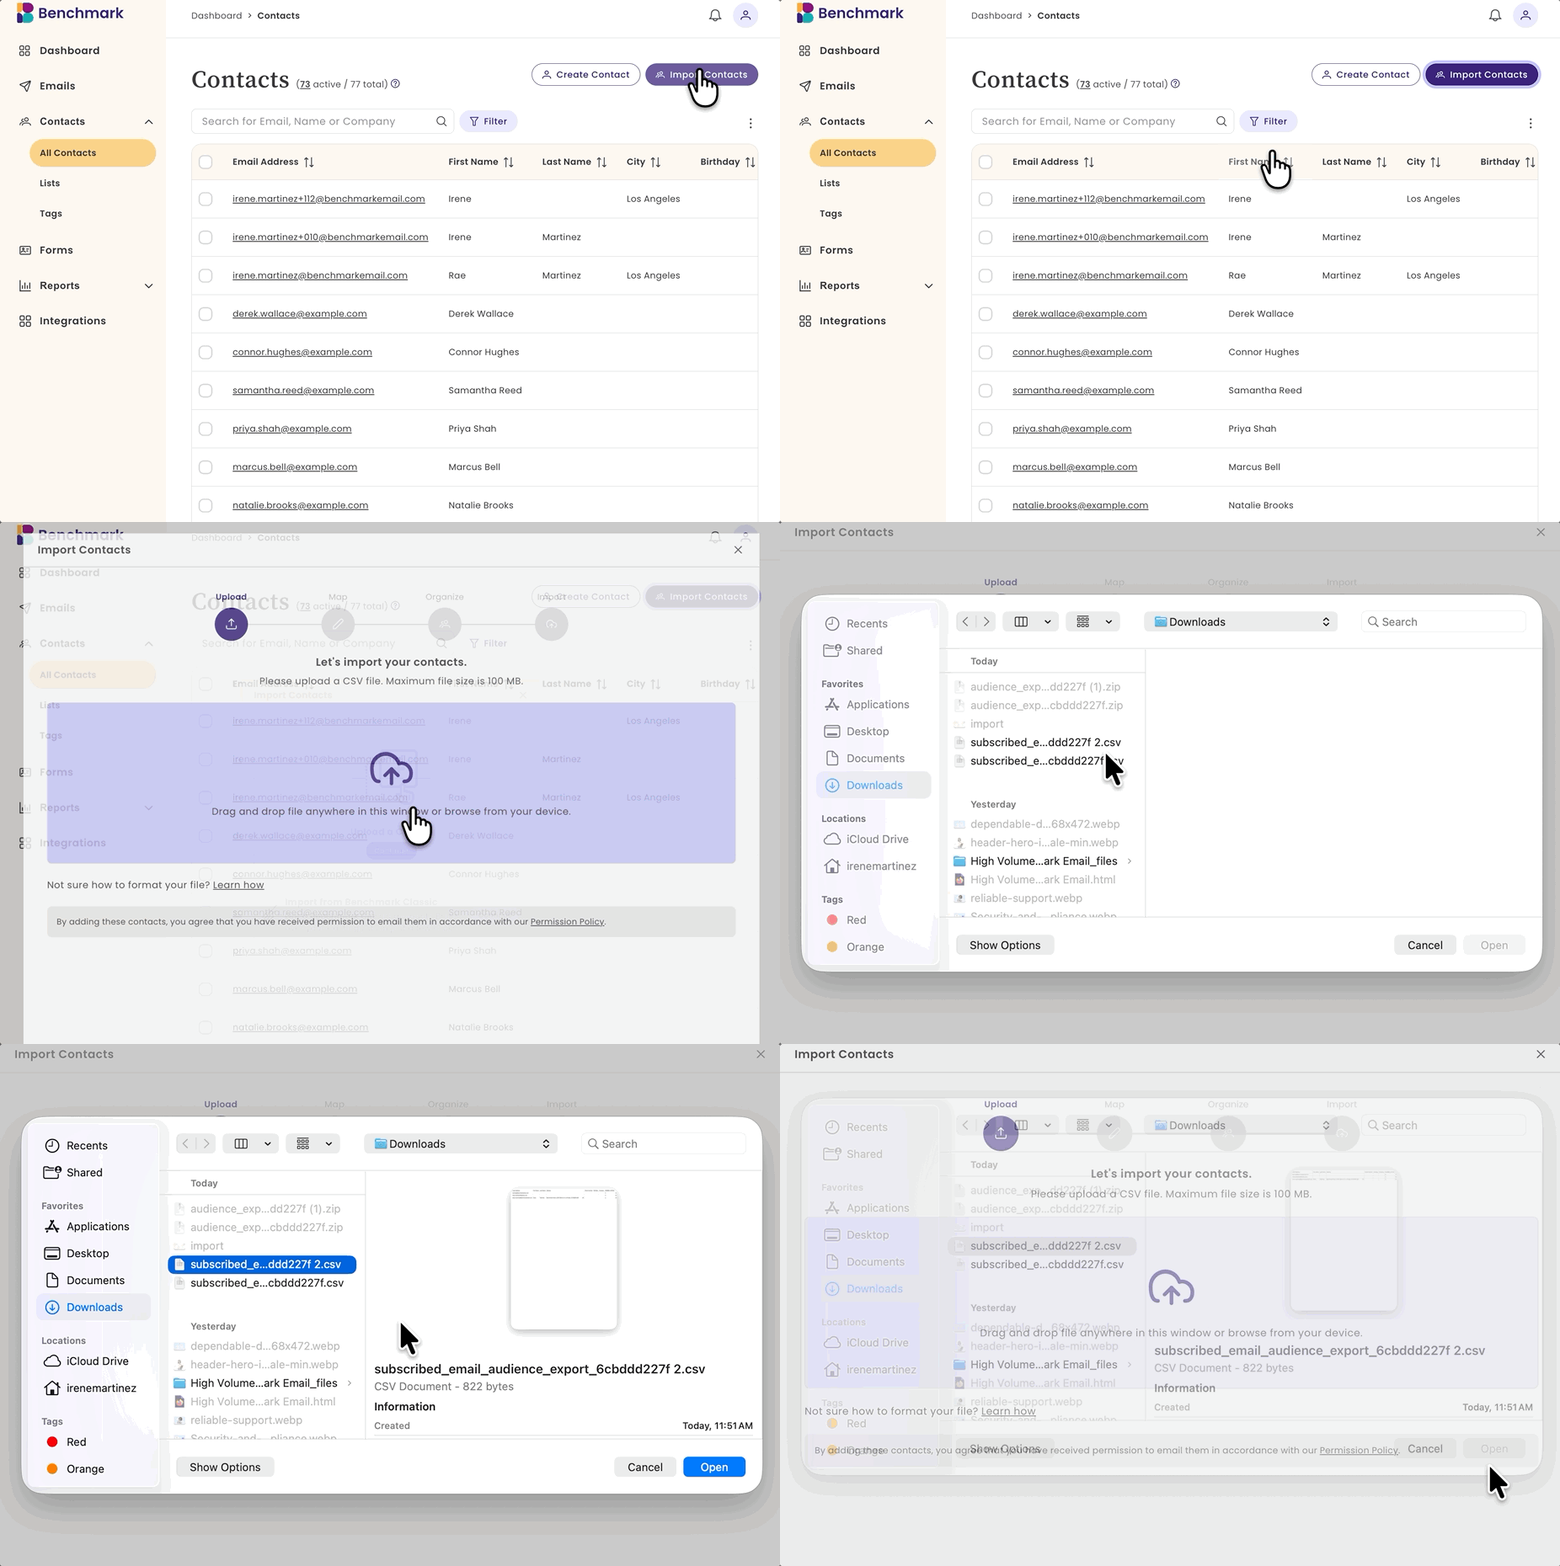
- Match the columns (email, first name, last name, and any custom fields) to Benchmark contact fields. Benchmark detects most columns automatically, so this is usually a quick check rather than a chore
- Choose which list the contacts should land in and add a tag if you want to remember where they came from (something like “from-mailchimp” works)
- Review and confirm the import
- Repeat with the unsubscribed CSV: import it into its own list and mark those contacts as unsubscribed on upload
If any rows get skipped, Benchmark gives you a downloadable file showing which ones and why, so you can fix them and re-import just those.
One tidy-up worth doing while you’re here: if you had several Mailchimp audiences or segments, import them into one list in Benchmark and use tags to tell them apart when you import your list. You can have up to 100 lists, but most accounts are easier to run with fewer.
Step 2: Move your email templates
You don’t have to rebuild the emails you like. Mailchimp shows you the HTML behind any sent campaign, and Benchmark has a custom HTML editor that takes it as-is.
One catch: this works for sent campaigns only. Drafts don’t expose their code, so send anything you want to keep (even just to yourself) before you start.
Copy the HTML from Mailchimp
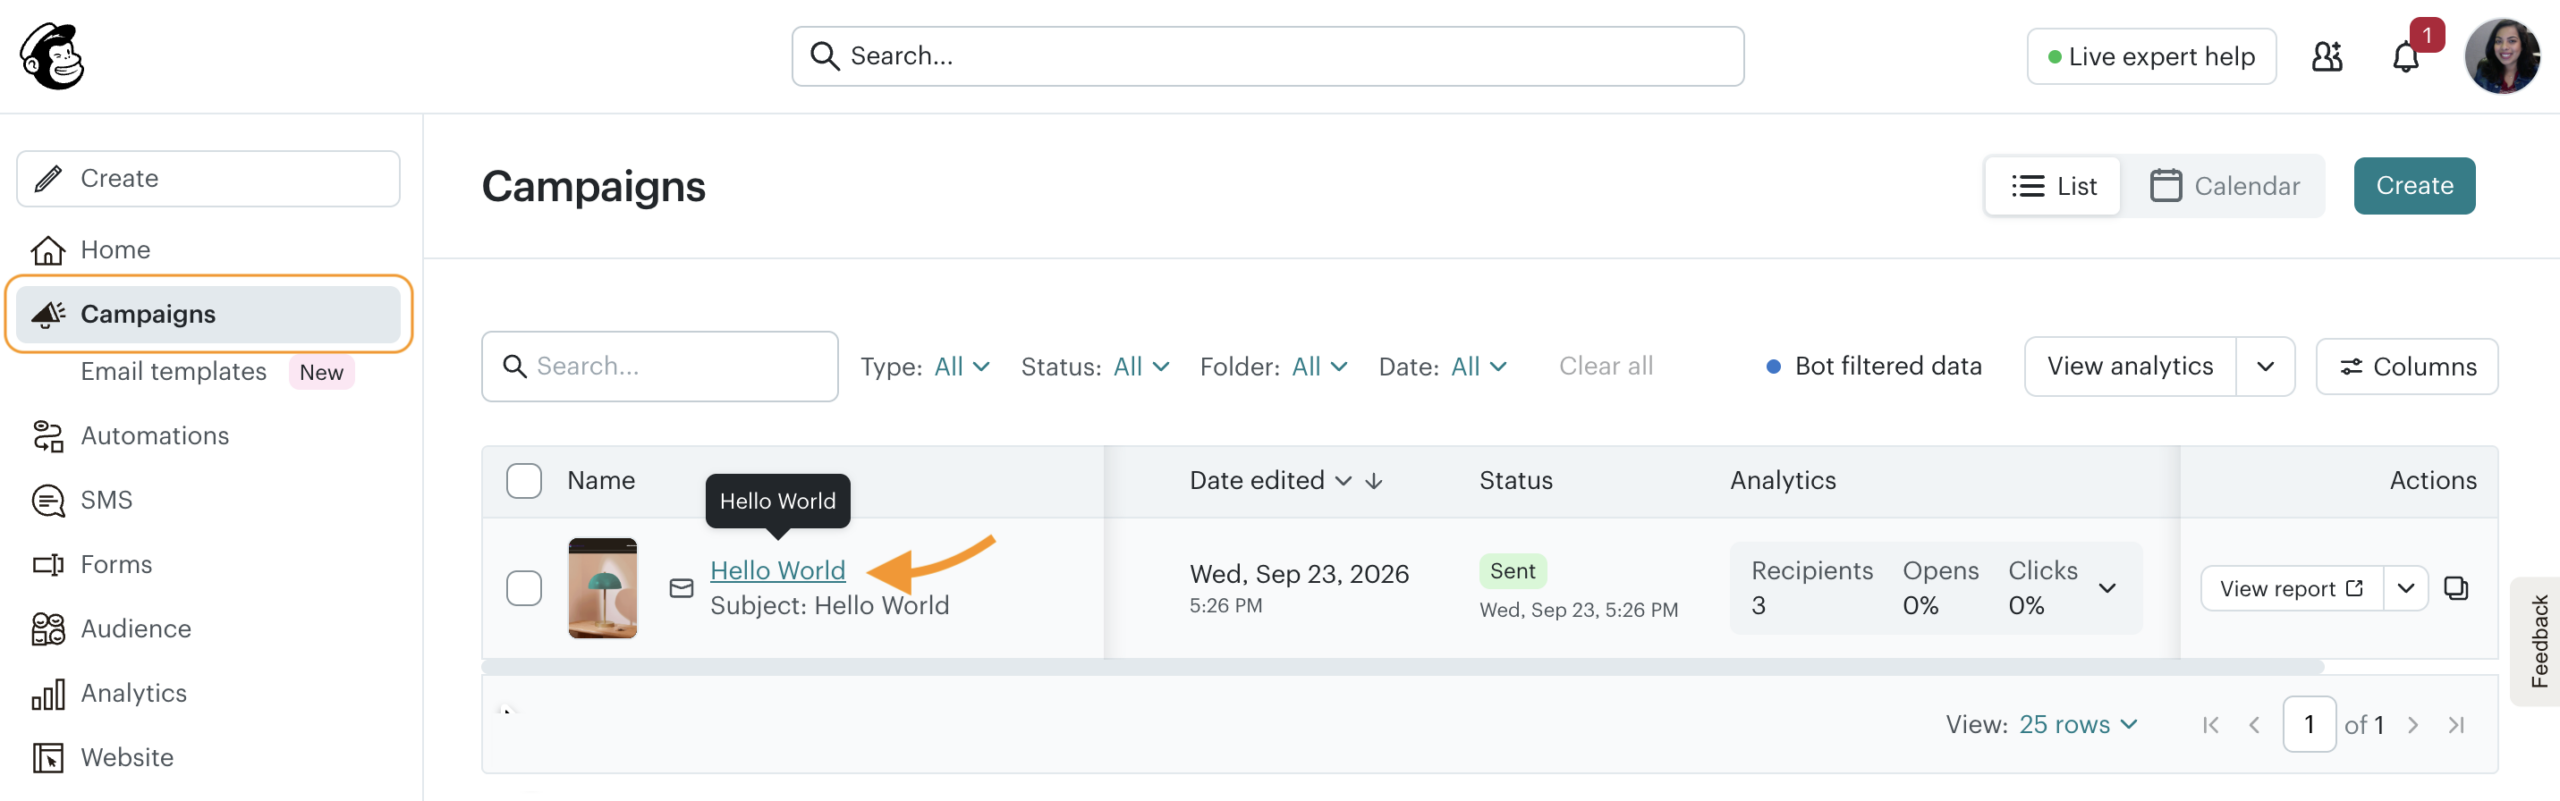
- In Mailchimp, click Campaigns
- Click the name of the campaign whose design you want
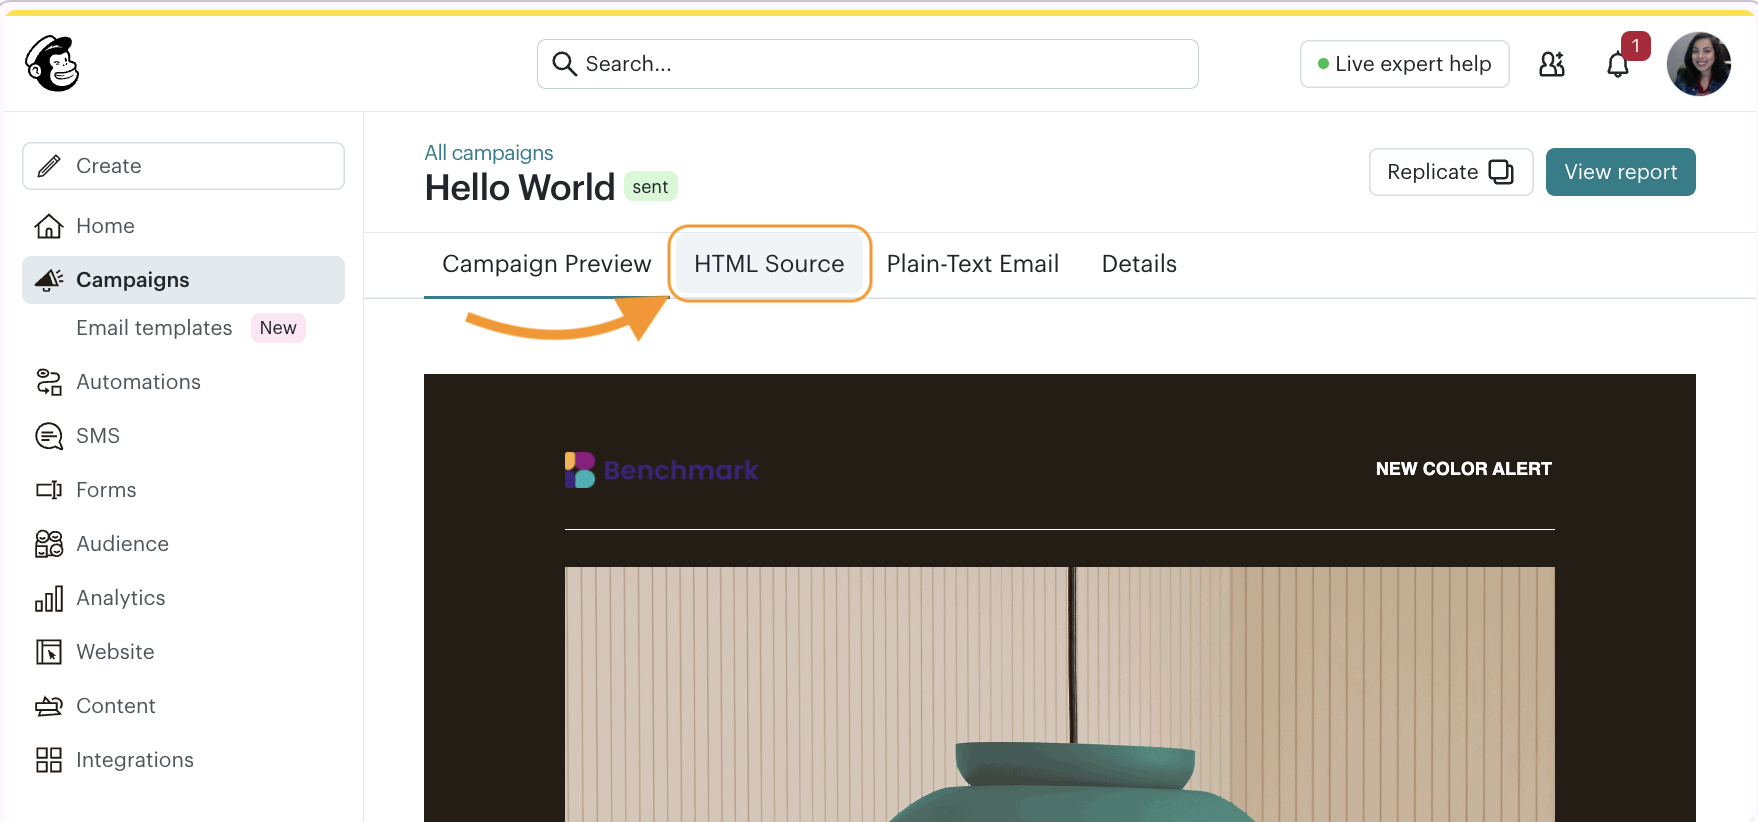
- In the campaign preview, select HTML Source
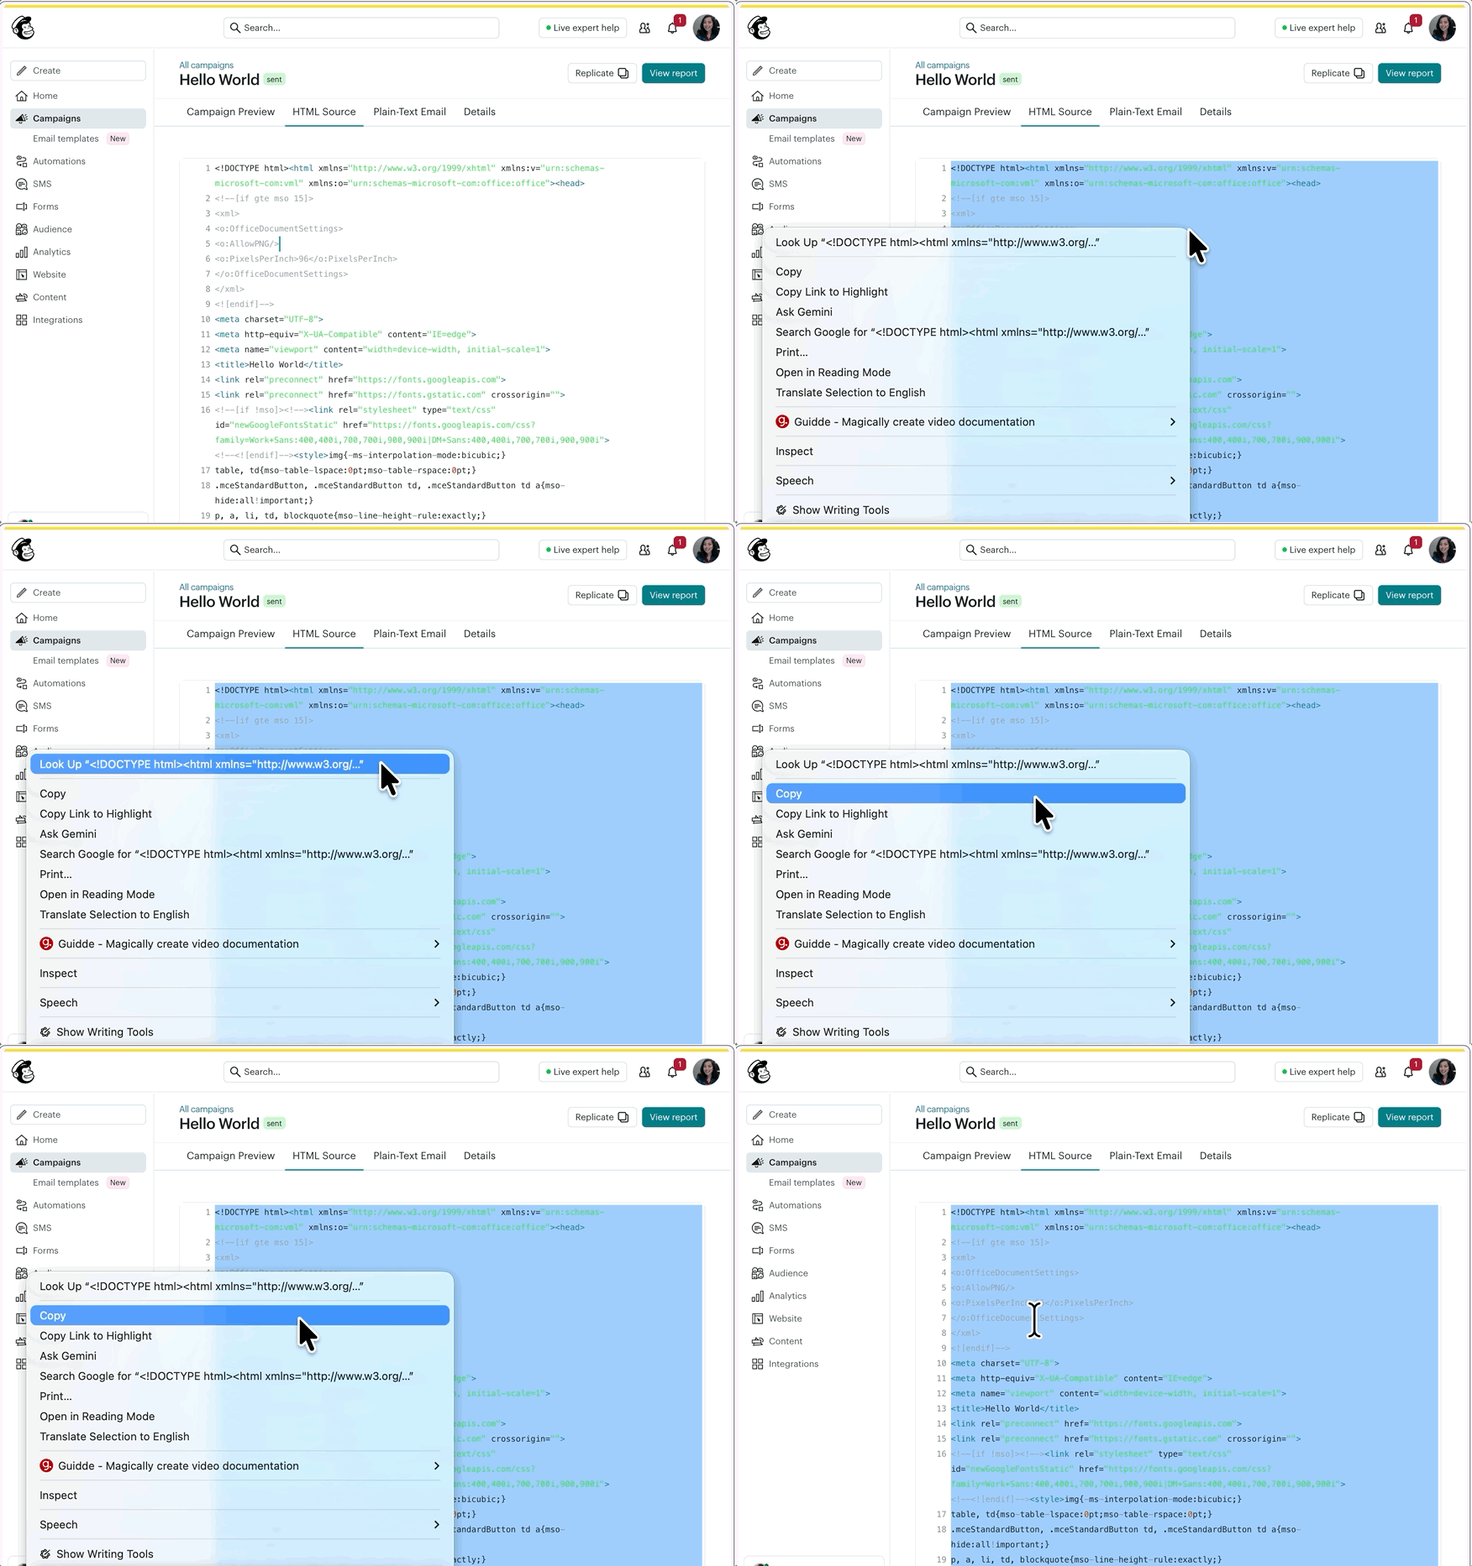
- Select all of the code, right-click, and choose Copy
Paste it into Benchmark Email
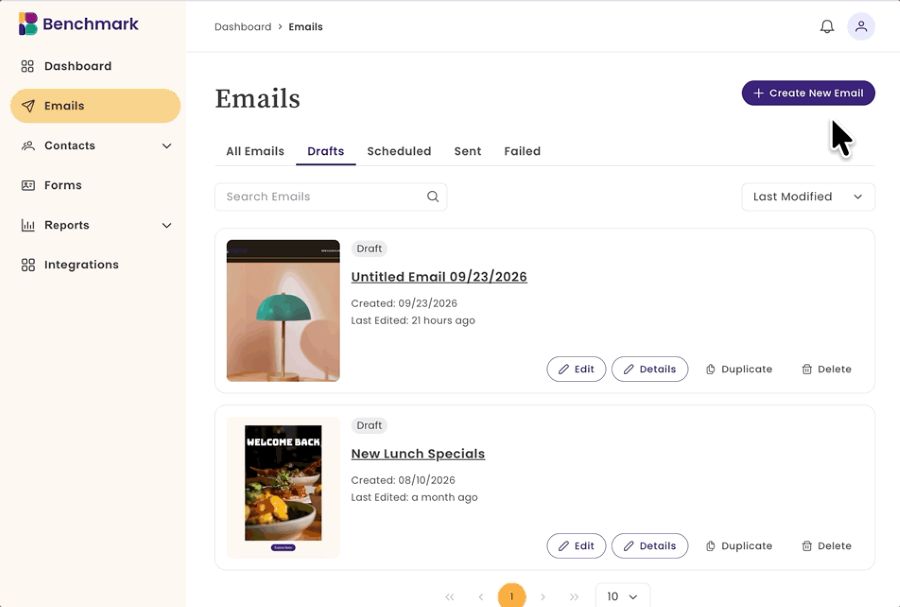
- In Benchmark, go to Emails and click Create Email
- Choose Custom HTML as the design type
- Select Start from Scratch and paste the code
- Check the live preview in both desktop and mobile views
- Click Send Test and open it on your phone
- Click Save & Next to keep going, or Save & Exit to come back later
Repeat for each template you want to keep. Three or four is typical; most people discover they only ever used a couple.
The pasted email should look the same as it did in Mailchimp, but always send that test. Custom code can render a little differently from one inbox to the next, and two minutes of checking beats a correction email. While you’re in there, delete any Mailchimp footer or unsubscribe block from the code. Benchmark adds a compliant footer with your company name, address, and unsubscribe link to every campaign automatically, so you’d end up with two.
Don’t love your Mailchimp templates? Benchmark’s drag-and-drop builder comes with ready-made templates for newsletters, product launches, and promotions, and rebuilding one from a template usually takes less time than debugging old code.
Step 3: Set up for your first send
Moving your contacts and templates is the bulk of the work, but a few final touches remain before you make a clean switch.
Verify your sending domain
Inbox providers want proof that Benchmark is allowed to send on your behalf. In Benchmark, that’s usually a single NS record: the platform detects your DNS provider and gives you instructions written for it. If your provider doesn’t allow NS records, we also support SPF, DKIM, and DMARC setup. Not sure what any of that means? Our (human) support team will walk you through it over chat or phone.
You don’t have to wait on verification to send, either. Benchmark provides a shared sending domain so you can send your first campaign right away while your own domain finishes verifying.
Swap your sign-up forms
Any Mailchimp form on your website will keep feeding your old account. Build a replacement with Benchmark’s drag-and-drop form builder, connect it to the list you just imported, and paste the embed code wherever the old form lived. It works on WordPress, Shopify, Wix, or anything that accepts HTML.
Send something small first
Pick a campaign you’d send anyway and send it to the people who opened your last few Mailchimp emails, then everyone else. It’s a gentle way to start on a new platform, and the real-time activity feed lets you watch opens and clicks come in as they happen. If the numbers look like what you saw in Mailchimp, you’re done. Cancel the old account once you’re confident everything is in place.
Frequently asked questions
Can my Mailchimp templates migrate automatically?
No. You copy the HTML from each sent campaign in Mailchimp and paste it into Benchmark’s custom HTML editor. It takes a couple of minutes per template.
Will my templates look identical?
They should, but preview and send a test before you use one in a live campaign. Custom code can render differently from one email client to the next.
Do I have to move contacts manually?
CSV export and import is the standard method, and it’s the one we recommend. Benchmark also has a Zapier integration that can create and update contacts from other apps, which is handy for keeping new sign-ups in sync, but it isn’t a replacement for the initial import.
What file format does Mailchimp export?
CSV, which is what Benchmark’s import tool accepts. No conversion needed.
Will I lose my unsubscribes?
No. Import your unsubscribed contacts as their own list and mark them as unsubscribed on upload. Benchmark then keeps them off every send, so nobody who opted out in Mailchimp hears from you by accident.
Do I need a paid plan to do any of this?
No. Everything in this guide is on every plan, including Free: the custom HTML editor, contact import, sign-up forms, and domain authentication. Free covers up to 500 contacts and 2,500 emails a month, so plenty of accounts can move over and start sending without paying anything. Paid plans raise those limits, add list verification, and let you remove Benchmark branding. Live chat and phone support with real people is there 24/7 if you ever need help.
Is there a faster way coming?
Maybe. We may add more automated options down the road, but today the CSV import and HTML paste are the two methods, and together they take about an hour.
Ready to move? Create your free Benchmark Email account and start with the contact import. If you get stuck on any step, our support team is a chat or phone call away.

Sign up for a free Benchmark Email account today!
SIGN UP FREEAbout the Author:

High level marketing, technical email topics, email trends | Jessica Lunk is the VP of Growth Marketing at Benchmark Email, where she combines strategic flair with hands-on expertise to help busy marketers elevate their email game. Delivering timely insights on list hygiene, ROI, and email deliverability, she’s a go-to voice for practical marketing wisdom.